According to Paul Zepf of Zarpac Inc. , OEE is most simply stated as: “Output divided by the scheduled time multiplied by the normal production rate. The answer (http://www.healthcarepackaging.com/archives/2008/10/fitting_oee_into_your_operatio.php), in percent, looks at what should have been made (or packaged) versus what actually was.”
By understanding how to address and control induction-sealing variables, companies can aspire to achieve a perfect seal every time. The process of developing a perfect seal solution includes matching the cap, liner, and sealer; setting up an operating window, and establishing testing methods for identifying a good seal.
Matching materials
Whether a closure (continuous-thread cap, child-resistant cap, or dispensing cap) is made from PET, PVC, PE, PP, PS, Gamma (multilayer), glass, Barex, PLA, or metal, a perfect seal can be achieved.
Choosing the right induction seal depends on the product being packaged. If the product contains any potentially aggressive or volatile ingredients, chemicals, acids, solvents, high salt content, alcohol or vinegar, a protective layer or barrier layer may needed. It can be sandwiched between the heat-seal film and the foil to prevent corrosion.
The liner is the next consideration. One type is a single-piece liner, which has a backing that is typically a board, foam, or paper layer. When inducted, the entire structure seals to the container lip, leaving nothing in the closure for resealability.
This type of liner is commonly used in food, beverage, and vitamin applications or products that do not require a reseal liner in the closure after the foil is removed.
Another classification is a two-piece liner--a wax bonded material that has a backing that is usually a board, pulp, or foam bonded to the foil-seal structure with a temporary wax bond. During the induction process the wax is heated, melted, and absorbed into the backing, which stays in the closure for resealability. When packaging an aggressive or volatile product, a barrier layer may be included between the heat-seal layer and the foil.
There is also a two-piece reseal that combines a high-barrier retain liner with the induction foil. High-barrier polyester film is laminated on the backing to provide better oxygen permeation rates and moisture vapor transmission rates after the foil seal is removed.
Finally, the removal characteristics must be determined. Does the application require a clean peel where the entire liner peels away cleanly without leaving any residue? Does the product require a weld seal or tamper-evident bond, where the foil must be destroyed to gain entry and leave a residue on lip of container? Or, is an easy-entry seal desired, where the membrane can be punctured with a finger or knife?
Select the right induction sealing equipment
A number of variables need to be considered to select the right machine for your induction sealing application. The foil diameter is one of the most important variables in sizing the equipment. A larger diameter of foil requires a different amount of energy to seal than a smaller one. Since there are many types of foils and varying thicknesses, they can heat up differently, so it is essential to document the application's foil type.
Knowing the line speed, preferably in feet-per-minute, is critical. If the containers are traveling fast, the container will not be under the sealer as long, therefore a more powerful sealer will be required. If the only information available is containers per minute, the spacing between containers--or pitch--needs to be determined.
Cap and bottle geometries are additional considerations when selecting the optimal induction sealing head for the application. There are many different types of caps and bottles and most can be sealed with a flat sealing head. However, some containers, such as those with sports caps, have a large gap between the top of the container and the induction liner that requires a special sealing head.
Additionally, the range of applications must be determined. If a wide range a containers or closures are to be sealed, the system needs to be sized for the complete range of cap/container/ speed configurations.
Once all the information is documented, proper power supply and sealing head options can be chosen. For smaller-diameter closures, a tunnel coil is typically the most efficient. For a sports cap or Yorker-type cap, a deep tunnel coil is most effective. When it comes to closures over 53 mm in diameter, a flat coil is the best solution. If the application includes a variety of closure sizes, an all-in-one sealing head may be the best choice.
Operating window steps
Once the cap, liner, and induction sealer have been selected, setting up an operating window for the induction sealer is the next step. An operating window enables the optimal sealing range to be determined by providing a record of sealing ranges that will provide no seal, a partial seal, a good seal, and an overheated seal. This information is important because it provides the foundational baseline for each application.
Below are five key steps to correctly setting up an operating window to achieve the perfect seal on your induction sealer .
Step 1: Correct induction seal aligment
Ensure that the orientation and alignment of the sealing head are correct. The air gap between the sealing head and the closure must be consistent. It is also important to make sure that the bottle path is controlled and travels under the center of the sealing head or under a pivoted sealing head, based on manufacturer's specifications.
Step 2: Check the variables including conveyor speed
Check the variables including conveyor speed. This should be a fixed value for a better result (if the operation requires sealing over variable conveyor speeds ask the induction sealer manufacturer about a variable sealing control option). Ensure that closures and containers are compatible, examine containers and caps for defects, and verify consistent closure application torque. More than 80% of all sealing problems are related to torque issues.
Step 3: Determine the minimum set point for induction sealing
Determine the minimum set point. Start by setting the output percentage at a minimum level of the induction sealer. With all of the other variables fixed, run a single container through the sealer. Check the container for a seal. If no seal was achieved, increase output in 5% increments until there is a partial seal. Then, increase the output of the induction sealer in increments of 1 to 2% until a complete seal is achieved; this is the minimum set point of the operating window.
Step 4: Set the induction sealer's maximum set point
Set the maximum set point. From the minimum set point, increase the output of the induction sealer by 5% until the liner or cap shows signs of overheating. Then, decrease the output of the induction sealer by 1 to 2% until overheating is eliminated. Once that is established, the maximum set point of the operating window is determined.
Step 5: Record the data.
The output percentage that yields the best seal will be somewhere within the window of minimum and maximum output set points. The variables that need to be recorded are details pertaining to the container, closure, liners, closure application torque, conveyor speed, sealing head air gap, and the output of the induction sealer including minimum, maximum, and optimal set points within that range. Determining a good seal
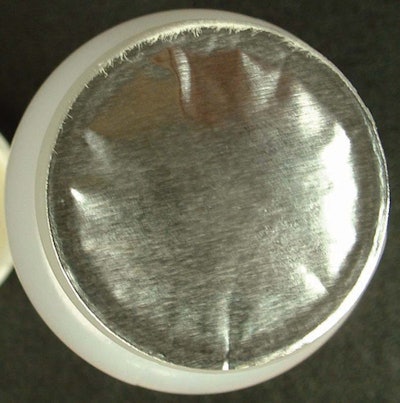
Although there are no industry standards for induction seal integrity, there are several ways to assess seal quality. Among the more effective methods are wet or dry vacuum testing, shipping the product to determine how it will respond, vision systems, mechanical pressure, and shaking, squeezing, or standing on a sealed container. Characteristics of good seals that are visible to the naked eye include no discoloration of the liner, good adhesion around the entire circumference, minimal wrinkling of the liner, and on two-piece liners, no darkening from overheating. While many problems can be avoided by establishing quality-control procedures on incoming caps and bottles, climate controlled storage, and FIFO inventory, it is beneficial to have a troubleshooting process based on the information provided in this article in order to expedite the identification and resolution of any induction-sealing problems.
In summary, maximizing OEE of an induction sealer requires a holistic approach that incorporates machine, materials, quality control, and operator education. To be successful, packagers must take responsibility for the variables that can deliver induction-sealing success, as outlined in this white paper. Once the induction sealer, container, and cap have been selected, it is critical to set up an operating window that will allow the sealer to be successful within a range of predetermined operating tolerances.
--By Ryan Schuelke, sales director, Enercon Industries